Examples#
In this example, we’ll walk through correcting an image using an ArrayCorrector.
It’s recommended to read at least the first section of the concepts description first.
Demo: correcting DASH image#
This tutorial uses an image from the Demonstration Airglow-Subtracted Heliospheric imager (DASH) as an example. For details on DASH see Section 4.2 of the accompanying paper.
Here is a visualization of the result we’re aiming to produce.
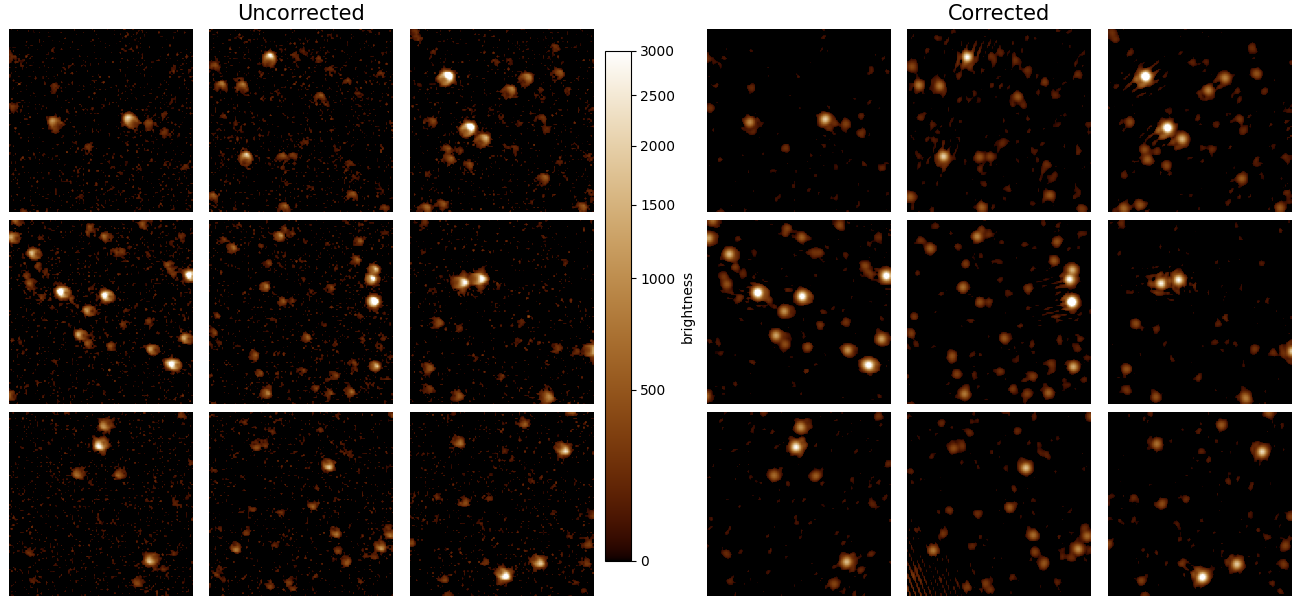
Image patches in a DASH image before and after PSF regularization. Left: Stars in each region exhibit a varying PSF before correction. Right: After application of a transfer PSF, the stars are more uniform across the image. The panels are gamma-corrected to highlight the periphery of the original and regularized PSFs.#
Defining input parameters#
Before you can correct an image, you need a PSF model for the system that collected the image. You can either define a functional model or an array model. A functional model is defined by an equation whereas an array model uses the data directly as the model. For most purposes, we recommend an array model because deriving the correct functional form can be tricky. Thus, this quickstart tutorial walks through the array model PSF model form.
First, we need to define both the psf_size and the patch_size. This technique breaks the image into
overlapping square neighborhoods of length patch_size on each side. In this case a patch_size of 256 indicates
we use a 256x256 neighborhood size. However, we know for
this instrument that the PSF is more compact than this, i.e. a star will not contribute light over the full neighborhood.
For computational efficiency reasons, we thus use a psf_size of 32x32. For each star, a box centered on the star
of size 32x32 pixels is extracted. These are averaged to create the PSF model. The region outside the 32x32 box but
within 256x256 pixel window is filled with the median of the image.
Finally, we need to set the target PSF model’s parameters. In this case, we will simply use a symmetric Gaussian and thus have one parameter: the full-width-half-maximum (FWHM). We set this at 3.25 pixels.
import numpy as np
from astropy.io import fits
from regularizepsf import CoordinatePatchCollection, simple_psf

# Define the parameters and image to use
psf_size = 32
patch_size = 256
target_fwhm = 3.25
image_fn = "data/DASH.fits"
Build the target PSF#
We first create a target PSF model by defining
a Python function that has inputs of x and y and outputs the value of the PSF at (x,y).
This is a functional model and is thus decorated with the simple_psf decorator. We evaluate the model over the full
patch size.
# Define the target PSF
center = patch_size / 2
sigma = target_fwhm / 2.355

@simple_psf
def target(x, y, x0=center, y0=center, sigma_x=sigma, sigma_y=sigma):
    return np.exp(-(np.square(x - x0) / (2 * np.square(sigma_x)) + np.square(y - y0) / (2 * np.square(sigma_y))))

target_evaluation = target(*np.meshgrid(np.arange(patch_size), np.arange(patch_size)))
Building the ArrayCorrector#
Everything else is handled in the find_stars_and_average method on the CoordinatePatchCollection. It takes a list of images, the psf_size, and the patch_size. The function’s signature is:
We convert from a CoordinatePatchCollection object
to an ArrayCorrector using the to_array_corrector method.
It requires an evaluated target PSF, which we constructed
in the previous section.
# Extract all the stars from that image and create a PSF model with a target PSF
coordinate_patch_collection = CoordinatePatchCollection.find_stars_and_average(
    [image_fn], psf_size, patch_size)
array_corrector = coordinate_patch_collection.to_array_corrector(target_evaluation)
Performing the correction#
Now we have all the components. It’s time to correct the image! We open it as a numpy array and then use the
array_corrector to correct.
Warning
The image data type must be float. Otherwise, you will receive a somewhat cryptic error about DTYPEs not matching. It also must match the endianness of your computer. This can be a problem as many computers are little-endian but FITS images are stored big-endian. This will be improved in future versions of regularizepsf.
Now we do the correction!
# Load the image for correcting
with fits.open(image_fn) as hdul:
    data = hdul[0].data.astype(float)

# See the corrected result!
corrected = array_corrector.correct_image(data, alpha=2.0, epsilon=0.3)
The signature of correct_image is:
You can save the ArrayCorrector for future use instead of having to derive it for each image image. This is done by simply:
array_corrector.save("path_to_save.psf")
Demo: Correction PUNCH Data#
As part of the DASH 2023 Conference we prepared an example with PUNCH data. You can find it and run it on Deepnote here.